Using a Public Wi-Fi Hotspot Securely
Tuesday 8th May 2018
The problem: You want to connect to the internet in a hotel or coffee shop, but don't want to expose your laptop to the insecure, unencrypted Wi-Fi network.
A solution: Connect to the internet through a Raspberry Pi, and have it forward a secure VPN connection through to your laptop.
Using a Public Wi-Fi Hotspot Securely
┣━━ What is wrong with just using a VPN?
┣━━ Using a Raspberry Pi to Connect Securely
┣━━ Initial Raspberry Pi Setup
┣━━ VNC SSH Tunnel
┣━━ Network Forwarding and Blocking
┣━━ Connecting to the Internet
┣━━ Potential Problems With This Design
┗━━ Conclusion
What is wrong with just using a VPN?
It is common advice to use a VPN when browsing the internet from a public Wi-Fi hotspot, however this is only effective to a certain extent:
- Your device is still connected to the network, so everybody else can see it.
- You have to deal with the captive portal (login page), which is essentially a man-in-the-middle attack on your device. It can be challenging to prevent these from auto-opening too, meaning that you are essentially surrendering your device into opening an arbitrary (and potentially malicious) web page.
- VPN leaks can be difficult to avoid and often catch you out:
- DNS
- IPv6
- Unexpected Disconnect
- Initial Connection
- Background Services on some OS's that seem to refuse to use the VPN
- Routes for private IP ranges
Using a Raspberry Pi to Connect Securely
A solution to this problem is to use a Raspberry Pi as a router, and have it forward through a connection to your external VPN.
The Raspberry Pi will connect to the public Wi-Fi hotspot and deal with the captive portal. The Pi will then forward an internet connection through the ethernet interface, which has all traffic blocked except for the IP address of your external VPN.
This means that your secure laptop never has to touch the insecure network, and it is not possible for VPN leaks to occur since all other traffic is blocked.
Requirements:
- Secure VPN accessible over the internet with a static IP (eg: OpenVPN on rented server)
- Raspberry Pi (any model)
- Wi-Fi adapter (if required)
- Ethernet cable
- SD card for Raspberry Pi
You don't have to use a Raspberry Pi - any device can function in the same way. A Raspberry Pi is just convenient, cost effective and easily accessible.
Initial Raspberry Pi Setup
This guide assumes that you already have basic Linux knowledge as well as a Raspberry Pi set up and working, and that you are able to connect to it over SSH or directly with a mouse and keyboard.
a. Ensure That SSH is Enabled at Boot
In order to ensure that the SSH server is set to start at boot, you can either place an empty file named ssh in the /boot directory:
$ sudo touch /boot/ssh
...followed by rebooting.
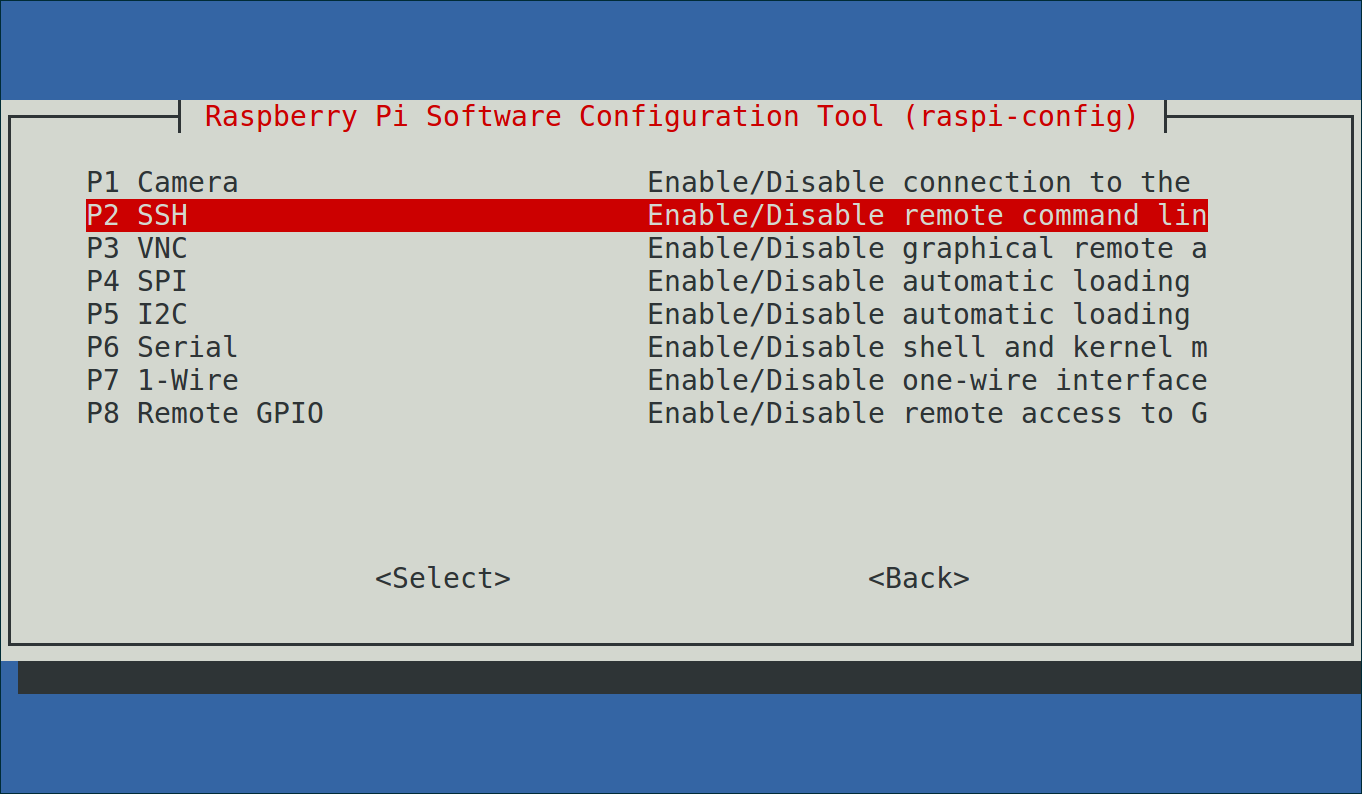
Or use raspi-config to enable it:
$ sudo raspi-config
Navigate to Interfacing Options -> SSH and ensure that SSH is enabled:
b. Configure UFW (Uncomplicated Firewall) and Fail2ban
Install ufw and fail2ban if they aren't already installed:
$ sudo apt-get install ufw fail2ban
Enable rate-limiting for SSH and enable the firewall:
$ sudo ufw limit 22/tcp
$ sudo ufw enable
Set a basic fail2ban config in order to block repeated failed SSH authentication attempts. Create the file /etc/ssh/jail.local and add the following content:
[DEFAULT]
bantime = 3600
findtime = 3600
maxretry = 3
c. SSH Server Hardening
It is recommended to use SSH key authentication, however if you wish to use password authentication, ensure that the password is strong.
Use your favourite text editor (eg: nano) to edit the file /etc/ssh/sshd_config, and ensure that the following values are set:
PermitRootLogin no
X11Forwarding no
PermitTunnel yes
Also ensure that the AcceptEnv LANG_LC* value is commented out (put a # at the start of the line).
If you are using SSH key authetication, you should also set PasswordAuthentication to no.
Additionally, you must set access rules in order to ensure that logins are only permitted from certain locations:
AllowUsers pi@<your-local-ip-address> pi@192.168.2.2
Substitute "<your-local-ip-address>" for the private IP address of your client device. This is the one that you can find from ifconfig (*nix) or ipconfig (Windows) - it most likely begins with "192.168.". Make sure that you use your private IPv4 address, as IPv6 will be disabled in order to help prevent VPN leaks.
The 192.168.2.2 address is part of the subnet that will be created later in this guide. If this subnet is in use on your network, you may select another one and adjust your configuration accordingly throughout the rest of the guide.
d. Disable IPv6
As much as I like IPv6, in this particular use case, it provides unnecessary complications and security risks. Public Wi-Fi hotspots rarely support IPv6 anyway, so it's not like you're missing out.
Edit the file /etc/sysctl.conf and set the following values:
net.ipv6.conf.all.disable_ipv6 = 1
net.ipv6.conf.default.disable_ipv6 = 1
net.ipv6.conf.lo.disable_ipv6 = 1
net.ipv6.conf.wlan0.disable_ipv6 = 1
net.ipv6.conf.eth0.disable_ipv6 = 1
VNC SSH Tunnel
For this setup, VNC will be used in order to provide remote desktop functionality. Remote desktop is required so that you can view the captive portal and authenticate in order to access the public Wi-Fi hotspot.
While it could be possible to handle the captive portal using a command-line browser such as elinks, many captive portals nowadays are unfortunately very JavaScript heavy and involve filling out forms, which elinks sometimes doesn't handle well.
It is not safe to run a VNC server that is exposed to an untrusted network. In order to lock it down, SSH tunneling can be used. This will tunnel the insecure VNC connection through the secure SSH tunnel, meaning that the traffic will be encrypted and integrity checked.
a. Install TightVNC Server
Install TightVNC server on your Pi:
$ sudo apt-get install tightvncserver
You can then start a VNC desktop bound only to localhost using the following command (adjust screen resolution as required):
$ vncserver :3 -geometry 1920x1080 -localhost
The :3 refers to the ID of the virtual screen. If you use another number here, you'll have to adjust the port number for connections later on.
The first time you start a VNC desktop, it will ask you to set a password. This password really does not matter, as it will not be used for authentication in this setup - the SSH tunnel handles this instead.
b. Configure the SSH Tunnel
On your client device, you can start an SSH tunnel connection to your Pi with the following command:
$ ssh -e none -x -L 5902:127.0.0.1:5903 pi@<your-pi-ip-address>
Syntax explanation:
- -e none: Disable the escape character, which prevents binary data (in this case, VNC) from accidentally closing the connection.
- -x: Disable X11 forwarding - meaning that you can't view graphical applications through the connection. In this case, X11 forwarding is not required so it is disabled for security.
- -L 5902:127.0.0.1:5903: This creates the tunnel. Connections to 127.0.0.1 (localhost) on port 5902 on the client will be forwarded through the tunnel to 127.0.0.1 port 5903 on the remote host. This means that connecting from your client to
localhost:5902will connect you to the remote desktop running on port 5903. Port 5900+N is the default port for VNC, where N is the display number. For example, if you want to connect to display 4, then port 5904 is what you should use.
For further details, please see the SSH manual page.
If you are using SSH key authentication, you can manually specify the location of the key using -i for example: ssh -i ~/.ssh/pi
c. Connect to VNC
Now that the SSH tunnel is established, you can connect to the remote VNC desktop through it. You must keep the SSH tunnel open for this to work and also ensure that you previously started the VNC server.
Using your favourite VNC-compatible remote desktop client (eg: Remmina), simply connect to localhost:5902. You should be prompted for the VNC password and the remote desktop session will start.
To clarify, connect from your client device to localhost:5902. The SSH tunnel that is running is listening for connections on this address, and it will forward them through the tunnel to the remote host (the Pi).

In order to terminate the VNC session, simply run vncserver -kill :3 from the SSH tunnel connection. You can then close the SSH connection as usual.
d. Chromium Browser Hardening
Chromium will be used to deal with the captive portal on the public hotspot. In order to provide some basic protection, it is recommended to disable JavaScript, cookies, Flash, etc. All of this can be done in Settings -> Advanced -> Content Settings.
You can then whitelist these on a per-site basis if required by clicking the left of the Omnibox (URL bar) and setting them to Allow.
I also recommend adding a bookmark for a site that does not use TLS. This is because you'll need to visit a HTTP-only website in order to trigger the redirect to the captive portal. [HTTP]neverssl.com is great for this.
Network Forwarding and Blocking
Next, you must configure your Raspberry Pi to act as a router, and then to block all connections except for those out to your VPN.
a. Enable Native IPv4 Packet Forwarding
Edit the file /etc/sysctl.conf and ensure that the option net.ipv4.ip_forward=1 is set. It is probably commented out by default - just remove the hash.
This configuration will be applied at the next reboot, although you can also reload the configuration now using sudo sysctl -p /etc/sysctl.conf.
If you forget to do this, your forwarded network connection will be extremely slow.
b. Configure Firewall Rules
Create a file named forward.sh (any name is fine), and insert the script shown below. This script will configure your Raspberry Pi to act as a router. All traffic between the Raspberry Pi and your laptop will also be blocked except for connections to itself and your external VPN.
In this example, I have used the IPv4 address of this web server (139.162.222.67) as the external VPN address - you must substitute this with the IP of yours. You may also need to use different network interface names (wlan0 and eth0). Check your interfaces using ifconfig.
#!/bin/bash
#Allow NAT
iptables -t nat -A POSTROUTING -o wlan0 -j MASQUERADE

#Block everything between Wi-Fi and Ethernet
iptables -I FORWARD -i wlan0 -o eth0 -j DROP
iptables -I FORWARD -i eth0 -o wlan0 -j DROP

#Allow VPN out
iptables -I FORWARD -o wlan0 -i eth0 -d 139.162.222.67 -j ACCEPT

#Allow VPN in
iptables -I FORWARD -i wlan0 -o eth0 -s 139.162.222.67 -m state --state RELATED,ESTABLISHED -j ACCEPT

#Allow client to Pi communication for SSH, etc
iptables -I INPUT -i eth0 -s 192.168.2.2 -d 192.168.2.1 -j ACCEPT

#Create 192.168.2.0/24 subnet
ifconfig eth0 192.168.2.1 netmask 255.255.255.0

#Delete default route for eth0
ip route del 0/0 dev eth0
Syntax explanation:
- iptables: A tool to modify the Linux kernel firewall.
- -t: The table to modify, for example:
-t nat. When no table is specified, thefiltertable is used, which contains the standardINPUT,OUTPUT, andFORWARDchains. - -A: Append the rule to the specified chain, for example
-A POSTROUTING. ThePOSTROUTINGchain is part of thenattable, and is used to alter NATted packets as they are about to go out (post-routing). - -I: Insert a rule at the top of the specified chain (meaning it will be applied first), for example
-A FORWARD. TheFORWARDchain is used to alter packets that are being forwarded, theINPUTchain is used for incoming packets, and theOUTPUTchain is used for outgoing packets. - -o: Match the name of the outgoing network interface (where the packet is going).
wlan0is Wi-Fi, andeth0is ethernet, however you may have different interface names. You can see your interfaces using theifconfigcommand. - -i: Match the name of the incoming network interface (where the packet arrived (where the packet arrived from).
- -s: Match the source address of the packets.
- -d: Match the destination address of the packets.
- -m: Match using an extension module. For example
-m state --state RELATED,ESTABLISHED, which will not match unsolicited connections. - -j: The action to take, for example:
ACCEPT,DROP,REJECTandMASQUERADE. Packet masquerading is another term for many-to-one NAT, which is what most IPv4 home/office networks use.
For further details, please see the iptables manual page.
Mark the script as executable:
$ chmod +x forward.sh
...and run the script once to apply it (or you can reboot):
$ sudo ./forward.sh
c. Configure the Script to Run at Boot
Add this file to root's crontab (task scheduler config):
$ sudo crontab -e
Add the following line, setting the correct path and name for your file:
@reboot sleep 3 && /path/to/forward.sh
This will run the script at boot, ensuring that your rules and configurations are always applied.
Connecting to the Internet
In order to actually connect to the internet using this setup, you must go through a short process. This is what you'll have to do once you're in your hotel room and you want to access the internet:
a. Secure VPN Client Configuration
Before you start, there are a couple of configurations you can make to your VPN client/server in order to harden it. The client configurations are possible in most VPN client software, such as network-manager-openvpn or Tunnelblick. It is recommended to make sure that:
- All traffic is set to go through your VPN - for example by configuring the OpenVPN
redirect-gatewayoption. - DNS is going through the VPN, and check for DNS leaks.
- Your connection is not leaking via IPv6.
- There are no static routes that do not use the VPN.
- An unexpected disconnect should cut the connection, rather than simply falling back to non-VPN.
This is not an all-inclusive list - make sure to do your own VPN security checks before continuing.
b. Hardware Connections
Connect your laptop to your Raspberry Pi using an ethernet cable and power on both devices.
c. Manually Connect to Your Raspberry Pi Router
Since no DHCP server is set up on the Pi, you'll have to connect manually.
This process varies depending on which operating system you are using, however on all common operating systems is it pretty easy to manually set your IP address, subnet mask, gateway, etc.
You should use the following values:
IP Address:  192.168.2.2
Subnet Mask: 255.255.255.0
Router:      192.168.2.1
You should not set a DNS server - your VPN client will handle this. Setting a DNS server entry just poses unnecessary risk should your locked-down connection somehow fail.
It is probably best to add a new network connection for this, rather than editing any existing ones.
d. Establish the SSH Tunnel
Once you are connected, you should be able to establish an SSH tunnel with your Pi. Remember that now you're using the ethernet interface, you will connect with the Pi's IP address on that interface:
$ ssh -e none -x -L 5902:127.0.0.1:5903 pi@192.168.2.1
If everything has worked, you will login to SSH successfully.
If this is your first time connecting to the Pi whilst it is connected via ethernet directly to your laptop, you should edit the /etc/ssh/sshd_config file and remove the AllowUsers entry for your previous network private IP address. You should never need to connect to your Pi that way again. Ensure that the value reads: AllowUsers pi@192.168.2.2.
e. Connect to VNC
Start the VNC desktop by running the following on your Pi:
$ vncserver :3 -geometry 1920x1080 -localhost
Then, using a VNC client on your laptop, connect to localhost:5902. The VNC desktop should appear. This time, the session will be much more responsive and have lower latency as you have a direct connection through the ethernet cable, rather than through your home/office network/router.
f. Connect to the Public Wi-Fi Hotspot and Deal With the Captive Portal
Using the remote desktop session, you can connect to the public Wi-Fi hotspot.
Open Chromium, and navigate to a website that does not use TLS, such as [HTTP]neverssl.com. The captive portal should then be shown. Ensure that you are on the legitimate captive portal (this can be hard to determine, but check the URL for known Wi-Fi services such as The Cloud or Virgin Wi-Fi - this is a prime opportunity for phishing attacks so be careful).
Enable JavaScript and cookies if required, and authenticate with the captive portal. Once done, you should now have a working (but insecure) internet connection on your Raspberry Pi.
g. Connect to Your External VPN From Your Laptop
Connect to your external VPN using whichever VPN client you desire. For example network-manager-openvpn for Linux systems using GNOME, Tunnelblick for Mac, etc.
You should now have a working internet connection through your VPN on your secure laptop. If your VPN drops, all other internet communications should be blocked. Make sure to test this in a safe environment (eg: on your own home/office Wi-Fi) in order to ensure that it is working as expected.
h. Shut Down the Pi Once You're Done
Once you are done with accessing the internet and want to shut down, just SSH tunnel into your Raspberry Pi again and shut it down with sudo halt. Give it around a minute to fully shut down, then disconnect it from the power.
Additional Information
It is extremely important that you keep your Raspberry Pi fully up to date. The device is sitting on an insecure network, so it is important that it's always fully patched. Use sudo apt-get update followed by sudo apt-get dist-upgrade in order to fully update your device. You should do this at least once per day.
Also double check that you updated the AllowUsers value in your SSH server configuration, as specified here.
Ensure that you did not open any ports or set any firewall rules for the VNC server. These are not required as it is tunneled through the SSH connection. Check your UFW config with sudo ufw status verbose, and remove rules if necessary. See ufw help for more information.
Potential Problems With This Design
There are a couple of potential problems with this design that I considered.
The iptables whitelisting rules are set on the device facing the insecure network:
Since this device is facing an insecure network and is used to visit the captive portal (which should be assumed to be malicious), it may be wise to consider this device permanently compromised - so the iptables rules cannot be trusted.
This is really just a theoretical problem and in the real world is unlikely to be exploited, however it is interesting to consider.
A solution to this would be to use an additional Raspberry Pi that sits in between the two devices. This second Pi would enforce the iptables rules and connect out to the VPN, meaning that the whitelisting rules are enforced by a device that isn't facing an insecure network and visiting untrusted web pages. This was my original plan for this project, however in an attempt to avoid over-complicating the setup, I tried to do it with just one Pi. I may look in to the two-Pi setup in the future.
The durability of the iptables rules:
If the iptables rules on the Pi are somehow overwritten or superseded, you may lose some of your protection. While this shouldn't happen, as general operating system activities such as connecting to a network should not modify or add any iptables rules, it is definitely worth considering.
This risk can perhaps be reduced by reapplying the rules again shortly after boot, or by repeatedly reapplying them (by checking the line numbers in the iptables chain and reapplying if required). Using a robust and leak-free VPN client configuration also greatly reduces this risk.
Conclusion
Overall I am extremely happy with this setup. I recently used it in a hotel for 5 days and it worked fantastically - the network speed through the Raspberry Pi was good and the connection was consistent. Upon returning home, I didn't factory reset my laptop before connecting it to my home network again like I would normally do, as the laptop had never actually touched the untrusted network or captive portal.
This device may not be convenient for short sessions. It does take around 5 minutes to get connected at the start, so this may not be ideal if you are just having a coffee or something. However, if you are in a hotel room and using your laptop for 6 hours each evening, the initial connection process is not a problem.
I plan to continue using this device when I stay in hotels in the future, and I will update this guide if I find any further security improvements or optimizations!