Managing Your SSH known_hosts Using Git
Tuesday 23rd April 2019
One of the largest challenges with infrastructure deployment and automation is managing and verifying the SSH server key fingerprints for your servers and devices. Each new server will have its own unique SSH fingerprint that needs to be verified and accepted before your devices (e.g. Ansible control machine, log collector) can securely connect via SSH.
Often, verifying and distributing the fingerprints is a manual process, involving connecting to machines to check and accept the fingerprint, or manually copying lines to your ~/.ssh/known_hosts file. In some cases, people also unfortunately bypass the warnings and accept the fingerprint without checking it, which fundamentally breaks the security model of SSH host authenticity checking.
I have recently solved all of these challenges by implementing a new solution for managing my saved SSH server key fingerprints (known_hosts). I'm storing a verified copy of each fingerprint centrally in a public Git repository, and I can then pull from the repository on all of my machines/devices whenever the key changes. This allows me to securely and semi-automatically distribute the fingerprints with minimal manual work required.
Skip to Section:
Managing Your SSH known_hosts Using Git
┣━━ What is the SSH known_hosts file for?
┣━━ Verifying the Fingerprints
┣━━ Managing known_hosts Using Git
┣━━ Client Configuration
┗━━ Conclusion
What is the SSH known_hosts file for?
The known_hosts file, normally located at ~/.ssh/known_hosts, is used to store the SSH server key fingerprints of the servers that you have connected to in the past. Each SSH server has its own (normally unique) server key and associated fingerprint. This is how a server identifies itself cryptographically, and are used by SSH clients to verify that future connections to the same server, are actually to the same server, and not to a different server because of a man-in-the-middle attack, DNS hijack, etc.
A known_hosts file may look similar to the following example:
ldn01.jamieweb.net,139.162.222.67 ssh-rsa AAAAB3NzaC1yc2EAAAADAQABAAABAQC4bVleGrAZFttdMBen/ExLWbUUr5UaaX3Wd8U4nwH6LEaOMxuYu2cyrBuwIVZ9gjSoI0fEWhe345HeQJbdNzE/rd5ojebtS9bQiAB9+GVNKHxemBP01M0OaZJVA/GJnSzjdoEfrCGG8SWIDPQjY02yTQwgQHW5zYlr12Hq3FjKzofJ1Q2PSWbCy3crsA/R4vPHRVLPd8RDj+EXWVwvFgTHriuQWnt9Q/djy1LOPrqNgHn1n17cIED1M0zgXpImoLNC+Z44DmopVdmtwRW57IkedktWQdpCNRYTyOj/as/xn5YStXIWwxila16NYeq6O7zqoedWPiad6qnFloobOcft
Fingerprints can be added to the known_hosts file in multiple ways, but there are two main ones:
-
Automatically when connecting to a server for the first time: When you connect to a server using SSH for the first time, if the fingerprint isn't already trusted, the SSH client will show a warning, and prompt you to accept or decline the fingerprint:
$ ssh ldn01.jamieweb.net
The authenticity of host 'ldn01.jamieweb.net (139.162.222.67)' can't be established.
ECDSA key fingerprint is SHA256:cNtT9V+VonaofCCCYjtul100tp1/g/wqdUJZ76GYoP4.
Are you sure you want to continue connecting (yes/no)?
If you choose 'Yes', the full key fingerprint will be added to your
~/.ssh/known_hostsfile. -
Manually: You can also manually add fingerprints to your
~/.ssh/known_hostsfile. The manual page explain the format in detail.In order to actually acquire the fingerprint to add to the file, you can use the
ssh-keyscancommand. This tool is included as part of OpenSSH on most Linux distributions, and is used to show the fingerprint(s) of a local or remote server. For example:$ ssh-keyscan ldn01.jamieweb.net write (ldn01.jamieweb.net): Connection refused # ldn01.jamieweb.net:22 SSH-2.0-OpenSSH_7.6p1 ldn01.jamieweb.net ssh-rsa AAAAB3NzaC1yc2EAAAADAQABAAABAQC4bVleGrAZFttdMBen/ExLWbUUr5UaaX3Wd8U4nwH6LEaOMxuYu2cyrBuwIVZ9gjSoI0fEWhe345HeQJbdNzE/rd5ojebtS9bQiAB9+GVNKHxemBP01M0OaZJVA/GJnSzjdoEfrCGG8SWIDPQjY02yTQwgQHW5zYlr12Hq3FjKzofJ1Q2PSWbCy3crsA/R4vPHRVLPd8RDj+EXWVwvFgTHriuQWnt9Q/djy1LOPrqNgHn1n17cIED1M0zgXpImoLNC+Z44DmopVdmtwRW57IkedktWQdpCNRYTyOj/as/xn5YStXIWwxila16NYeq6O7zqoedWPiad6qnFloobOcft # ldn01.jamieweb.net:22 SSH-2.0-OpenSSH_7.6p1 ldn01.jamieweb.net ecdsa-sha2-nistp256 AAAAE2VjZHNhLXNoYTItbmlzdHAyNTYAAAAIbmlzdHAyNTYAAABBBL1leJtyWMXV+xAny4v6E7JYM8CY4Oyac34L8gEDLGhvFWMIEHkjREVpfmWVLMYF7iMaaCY7ntxOfxSEReTQnV0=
Keep in mind that
ssh-keyscanis still susceptible to man-in-the-middle and other spoofing/hijacking attacks, so it shouldn't be used as an authoritative method for checking the integrity/authenticity of keys.However, if you are running the
ssh-keyscantool against localhost, then that is a valid way to get the correct version of a fingerprint. This can then be used to check that you have the correct fingerprint on your other devices as well.
On some Linux distributions, the HashKnownHosts on option is used in the default global SSH client configuration (/etc/ssh/ssh_config). If this option is enabled, it means that the hostnames and/or IP addresses of the hosts in your known_hosts file will be hashed. This is a security feature designed to obscure the hosts that you have connected to, should an attacker gain access to your known_hosts file. However, in many cases, this protection will not be adequate, as there will be plenty of other evidence as to which servers you have been connecting to (~/.bash_history, local firewall logs, etc).
Verifying the Fingerprints
In order for the security model of SSH to be effective, it is absolutely imperative that you correctly verify the fingerprints of a server before connecting for the first time. Failing to do this is equivalent to bypassing a HTTPS certificate warning, or installing an Apt package that has invalid GPG fingerprints.
Most public SSH servers share their official fingerprints through an alternate channel that is resistant to man-in-the-middle attacks, such as a website served over HTTPS. For example, here are the official fingerprints for GitLab and GitHub.
Then, when connecting to the SSH server, you can verify that the fingerprint displayed on your screen match the official ones distributed by the provider:
$ ssh -T git@github.com
The authenticity of host 'github.com (140.82.118.4)' can't be established.
RSA key fingerprint is SHA256:nThbg6kXUpJWGl7E1IGOCspRomTxdCARLviKw6E5SY8.
Are you sure you want to continue connecting (yes/no)? yes
Warning: Permanently added 'github.com,140.82.118.4' (RSA) to the list of known hosts.
If you are setting up a new server of your own, checking the fingerprints can often be a challenge. My go-to solution to this is to log onto the server directly, i.e. using KVM or a remote console, and then checking the keys manually using ssh-keyscan localhost. Unless somebody is able to MitM connections to localhost (which is unlikely unless they're already on your server), this is a good way to check the fingerprints of a remote server before connecting.
If for some reason it's not possible to get a verified fingerprint from the provider or by checking manually, there are still some things that you can do to gain some level of assurance of the authenticity of the fingerprint:
- Check the fingerprint from multiple different devices and network connections
- Ask some trusted friends to check it from one of their own machines
- Check the fingerprint over Tor
- Check the fingerprint using a public internet connection
If all of these methods return the same fingerprint, that is good assurance that there is no localised MitM attack ongoing. However, it's important to keep in mind that these methods do not protect against possible MitM attacks that are non-local, e.g. on the remote end or at the ISP or DNS level.
The Qubes OS 'Why and How to Verify Signatures' documentation, while not directly about SSH, explains the mindset that you need to approach signature/fingerprint verification with really well. Their approach to 'Distrusting the Infrastructure' also fits in perfectly with the security model of SSH.
Managing known_hosts Using Git
When I deploy new servers, they have new, unique SSH server key fingerprints, and I need to distribute these fingerprints securely to all of the other devices that will be connecting. For example, my Ansible control machine, log collector, etc.
Previously, the was a manual job. For a couple of devices from time-to-time, it's not a major problem. However, now that I'm further going down the road of ephemeral infrastructure, where my individual servers are essentially fungible and can be redeployed in minutes using Ansible, I needed a better solution.
I've created a public Git repository on GitLab, which I am using as an authoritative source for my server SSH key fingerprints. When a fingerprint changes, I just need to manually verify it, then update it in the repository using the little script that is included.
I recently redeployed my ldn01.jamieweb.net (London) server, which was my first time using this setup in production. I first took a note of the fingerprint directly on the server using console access and ssh-keyscan localhost, then proceeded as follows on my local development machine:
$ ./update-known_hosts.sh ldn01
Getting LIVE fingerprint for 'ldn01' (ldn01.jamieweb.net)...
Files /dev/fd/63 and /dev/fd/62 differ
The live fingerprint has CHANGED:
# ldn01.jamieweb.net:22 SSH-2.0-OpenSSH_7.6p1
ldn01.jamieweb.net ssh-rsa AAAAB3NzaC1yc2EAAAADAQABAAABAQC4bVleGrAZFttdMBen/ExLWbUUr5UaaX3Wd8U4nwH6LEaOMxuYu2cyrBuwIVZ9gjSoI0fEWhe345HeQJbdNzE/rd5ojebtS9bQiAB9+GVNKHxemBP01M0OaZJVA/GJnSzjdoEfrCGG8SWIDPQjY02yTQwgQHW5zYlr12Hq3FjKzofJ1Q2PSWbCy3crsA/R4vPHRVLPd8RDj+EXWVwvFgTHriuQWnt9Q/djy1LOPrqNgHn1n17cIED1M0zgXpImoLNC+Z44DmopVdmtwRW57IkedktWQdpCNRYTyOj/as/xn5YStXIWwxila16NYeq6O7zqoedWPiad6qnFloobOcft
Accept updated fingerprint? (y/n) y
Updating saved fingerprint...
Done. Saved old fingerprint as ldn01/fingerprint.bak.
Note that I only accepted the changed fingerprint after checking that it matched the one I got directly from the server.
Once the key fingerprint file had been updated, I committed the changes:

Next, I pushed the changes to GitLab. In my case, I pushed to a completely separate staging repository first, so that I can formally review the changes on my sandboxed Ansible control machine before proceeding.
In order to merge the changes from jamieweb-staging/known_hosts to jamieweb/known_hosts, I created, reviewed and accepted a merge request:
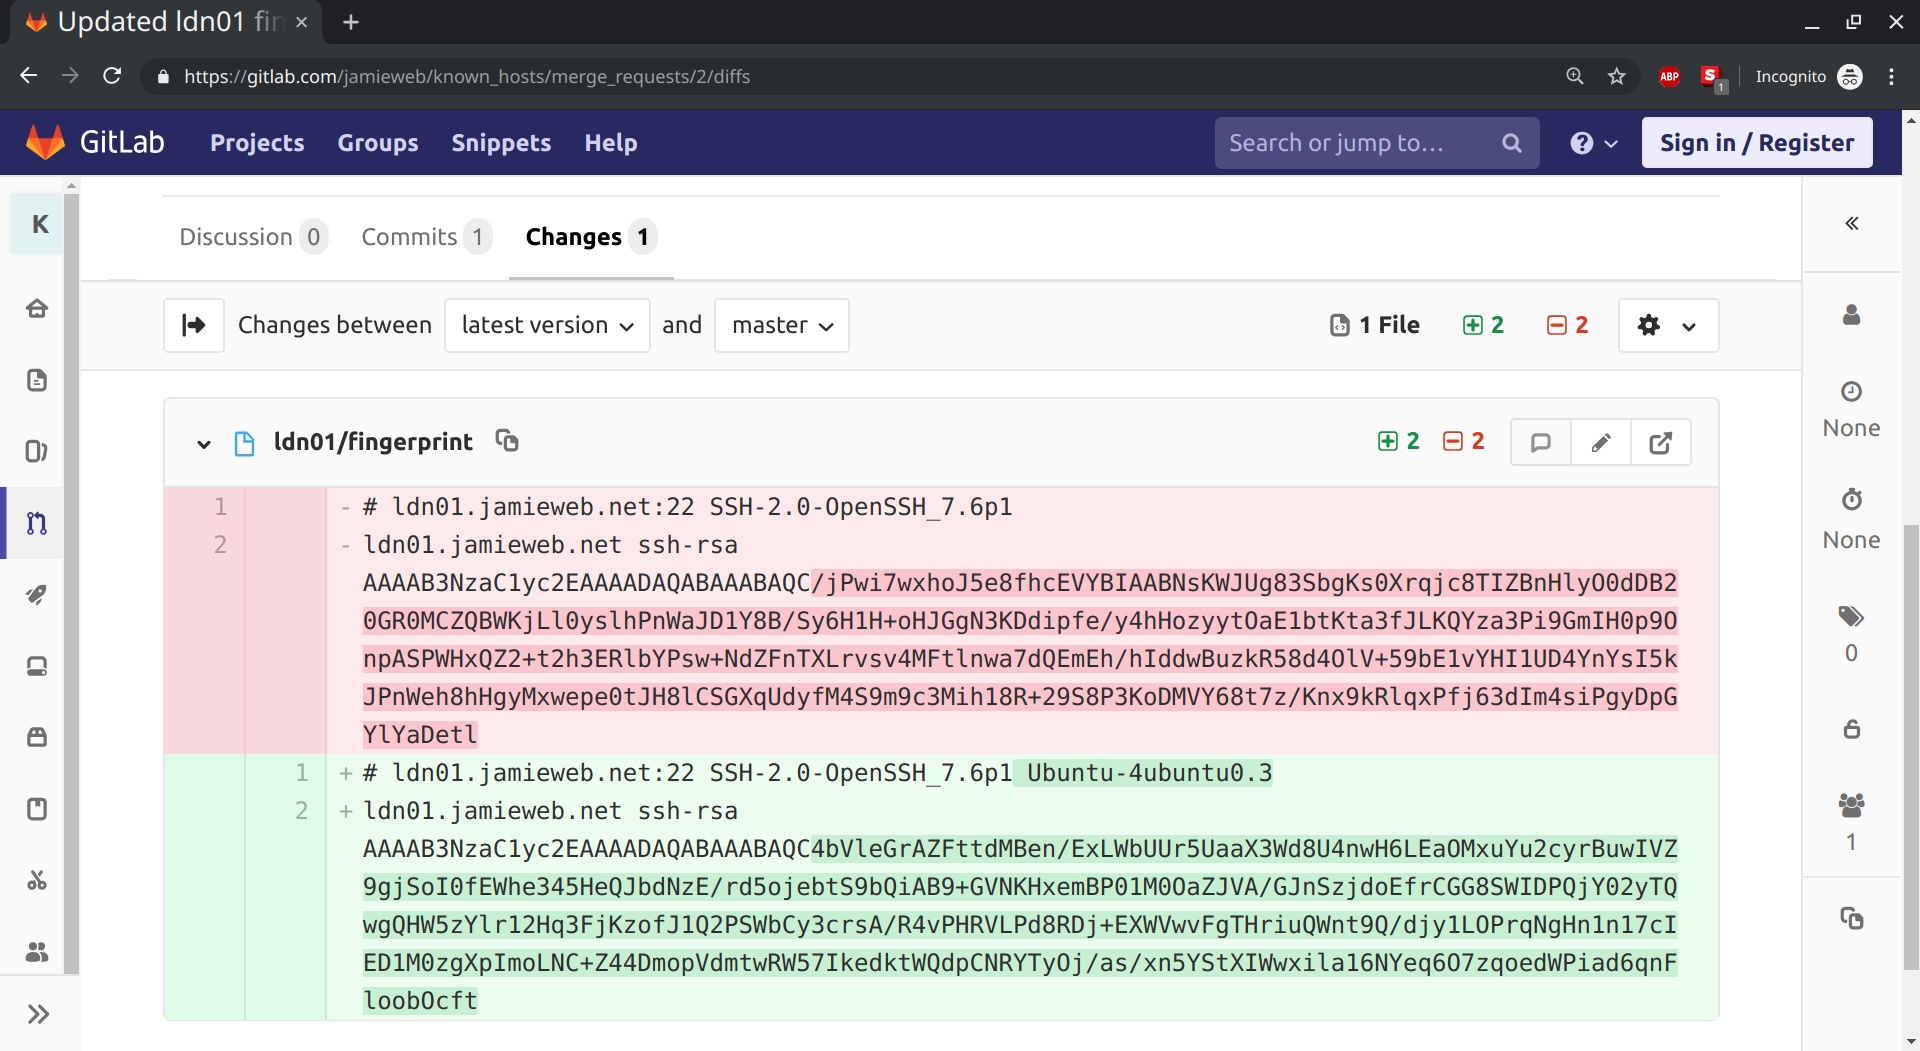
An interesting note about this diff is that the new fingerprint still shows the full OpenSSH version details from the SSH banner. This is because this was a completely fresh server that had been deployed only minutes earlier, and I had not yet run my Ansible playbooks to configure and update the server, part of which involves disabling the extended version information in the SSH banner with DebianBanner no in /etc/ssh/sshd_config.
Once I had completed the merge request, I pulled the updated repository contents to my Ansible control machine, where I proceeded to run my playbooks against the new server securely over SSH. I didn't have to accept the fingerprint, as simply pulling from the Git repository had done that for me, in a secure and automated way.
Client Configuration
In order for this setup to work, there are a couple of minor client configurations that you'll need to do.
-
Firstly, you'll need to tell SSH where your fingerprints are stored: This can be done using the
UserKnownHostsFileoption in your local (or global if you want) SSH config.UserKnownHostsFileis a space-separated list of paths to files containing valid fingerprints that SSH will use when connecting to servers. The first defined file is used as the main one, and is where new fingerprints will be saved to. I prefer to use the default~/.ssh/known_hostsfile as the main one, and then add the other files from the Git repository afterwards. For example:UserKnownHostsFile ~/.ssh/known_hosts ~/jamieweb/known_hosts/ldn01/fingerprint
-
Secondly, when updating the fingerprints, you may have to remove the old ones from
~/.ssh/known_hosts: Depending on your configuration, SSH will add a copy of the fingerprints from the Git repository to the main fingerprints file (which in my case is~/.ssh/known_hosts. When you update the fingerprints by pulling from the Git repository in the future, you may need to remove (or comment out) the old ones in your main fingerprints file.This normally happens if there are already existing fingerprints in
~/.ssh/known_hostsfor the hostnames or IP addresses that you are managing the fingerprints for in Git.
Conclusion
This setup has resulted in an enormous improvement in efficiency when it comes to deploying and managing my infrastructure. It's another great example for why all manual processes should be automated in a repeatable and verifiable way, in order to ensure that infrastructure is robust and resilient.
Using this setup has shaved off a significant percentage of my total infrastructure build time. However, I plan to keep using and working on this system in order to identify any further improvements that I can make.